
The concept of this tutorial is really simple. We may not want the image effect to be applied on the whole screen. We may want it in an area of a specific shape. Those are just some simple applications of mask textures in image effects. A mask texture is usually a black and white image used, well, as a mask. They have multiple applications, simple or more complex, and they can be used to achieve some pretty neat effects.
The shader we’ll be looking at produces the result seen here (as well as the featured image) :
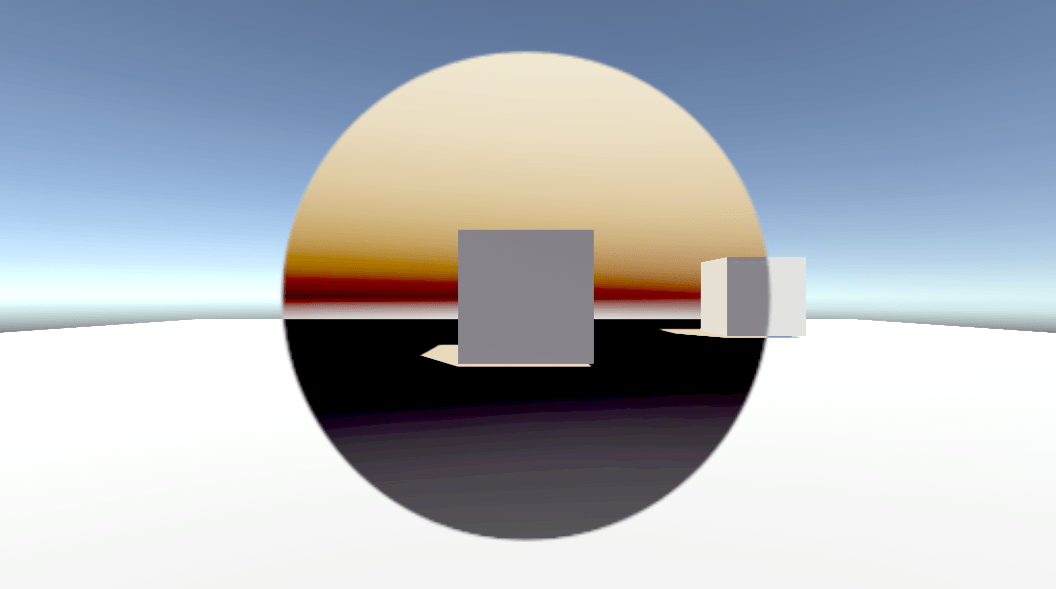
Pretty simple concept: just apply the default color inversion image effect on a circle area, instead of the whole screen. The method shown in the shader is not ideal as it needs a mask texture with the same aspect ratio as the screen, otherwise the masked area will be deformed. But, hopefully, it will give you a good idea of how to manipulate the black and white colors to use as a mask.
The mask texture used here is this one, with a 16:9 aspect ration to fit most screens:
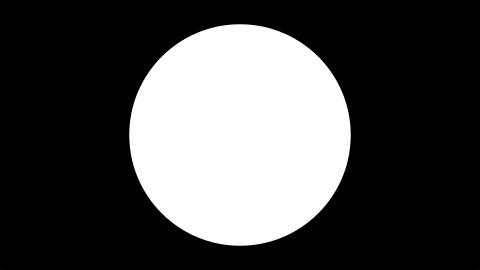
It took me more than 17 hours to make this mask texture, so if you’re going to use it I would appreciate asking me first. That was a joke.
Enough silliness, off to the code!
Shader "Custom/MaskInvert"
{
    Properties
    {
        _MainTex ("Texture", 2D) = "white" {}
        _MaskTex("Mask texture", 2D) = "white" {}
    }
    SubShader
    {
        // No culling or depth
        Cull Off ZWrite Off ZTest Always

        Pass
        {
            CGPROGRAM
            #pragma vertex vert
            #pragma fragment frag

            #include "UnityCG.cginc"

            struct appdata
            {
                float4 vertex : POSITION;
                float2 uv : TEXCOORD0;
            };

            struct v2f
            {
                float2 uv : TEXCOORD0;
                float4 vertex : SV_POSITION;
            };

            v2f vert (appdata v)
            {
                v2f o;
                o.vertex = UnityObjectToClipPos(v.vertex);
                o.uv = v.uv;
                return o;
            }

            sampler2D _MainTex;
            sampler2D _MaskTex;

            fixed4 frag (v2f i) : SV_Target
            {
                fixed4 col = tex2D(_MainTex, i.uv);
                fixed4 mask = tex2D(_MaskTex, i.uv);
                col = (1 - col) * mask + col * (1 - mask);
                return col;
            }
            ENDCG
        }
    }
}
So what’s going on here: in line 6 I added a new property for the mask texture. The syntax is exactly the same with _MainTex. As always, the new property needs to be redeclared inside the shader. Therefore, in line 42 I redeclared it as a “sampler2D”, which is basically a 2D texture.
Again, the magic is happening in the fragment shader: You may have noticed that this time I used the “tex2D” function twice. The first time was to get the normal color of the screen. The second time was to get the color of the mask texture as it’s being applied to the uv coordinates of the screen. Hence, the variable “mask” basically holds the black and white values of the mask texture as applied to the screen uv coordinates. So you can imagine the two textures (the mask and the camera output) being the one on top of the other in front of the screen. Of course this is not happening, as I still haven’t talked about outputting any colors whatsoever.
In line 48 is where the mask is actually applied. It will make complete sense if you think about this: Multiplying any color X with white, will give you the original color X, as white is represented as (1, 1, 1, 1). Multiplying any color with black will give you black, as black is represented as (0, 0, 0, 1). So, line 48 does the following:
- Take the inverted color and multiply it with the mask. According to the above, this will return the mask where the white circle is replaced by the inverted color of the screen.
- Take the regular color and multiply it with the inverted mask. Again, using the above, that would return the regular camera output with a black circle in the middle.
- Add those two together and assign the sum to “col”.
So basically it adds those two together:


I believe I may have over-explained it but it was such a simple concept that the post would otherwise be too small. Despite its simplicity, though, this kind of “technique” is really useful and when I found out about it I was more confident in experimenting with shaders and image effects. I hope it has the same effect on you too!
See you in the next one!


