
Picking up where I left off, this post is the second and final part that concerns custom masks, and more specifically, ring shaped masks. This shader uses the same technique as the one shown in the first part in order to make a ring-shaped mask that has similar flexibility as its disk-shaped counterpart. In terms of flexibility, the only addition will involve a new property to change the radius of the inner disk, in order to make the ring thicker or thinner. This shader can produce results like the following:


Again, to have your game screen look like this is basically useless. But layering a ring with a displacement effect can give you a really cool shockwave effect, which I will demonstrate in another post.
For now, let’s see some code!
Shader "Custom/RingMask"
{
	Properties
	{
		_MainTex ("Texture", 2D) = "white" {}
		_Radius("Radius", float) = 1.0
		_Thickness("Thickness", float) = 0.5
		_CenterX("CenterX", float) = 0.5
		_CenterY("CenterY", float) = 0.5
		_SizeX("SizeX", float) = 1
		_SizeY("SizeY", float) = 1
		_Hardness("Harndess", float) = 1.0
		_Invert("Invert", Range(-1.0, 1.0)) = 0
	}
	SubShader
	{
		// No culling or depth
		Cull Off ZWrite Off ZTest Always

		Pass
		{
			CGPROGRAM
			#pragma vertex vert
			#pragma fragment frag

			#include "UnityCG.cginc"

			struct appdata
			{
				float4 vertex : POSITION;
				float2 uv : TEXCOORD0;
			};

			struct v2f
			{
				float2 uv : TEXCOORD0;
				float4 vertex : SV_POSITION;
			};

			v2f vert (appdata v)
			{
				v2f o;
				o.vertex = UnityObjectToClipPos(v.vertex);
				o.uv = v.uv;
				return o;
			}

			sampler2D _MainTex;
			float _Radius;
			float _Hardness;
			float _CenterX;
			float _CenterY;
			float _SizeX;
			float _SizeY;
			float _Invert;
			float _Thickness;

			fixed4 frag (v2f i) : SV_Target
			{
				fixed4 c = tex2D(_MainTex, i.uv);
				float dist = length(float2(i.uv.x - _CenterX, i.uv.y - _CenterY) * float2(_SizeX, _SizeY));
				float rd = _Thickness/2;
				float rc = _Radius - rd;
				float circle = saturate(abs(dist - rc) / _Thickness);
				float circleAlpha = pow(circle, pow(_Hardness, 2));
				float a = (_Invert > 0) ? circleAlpha * _Invert : (1 - circleAlpha) * (-_Invert);
				half4 col = (c.rgb, a * c.a);
				return col;
			}
			ENDCG
		}
	}
}
Properties and fragment shader
Lots of similarities with the last one. However, there are some significant differences, obviously. Firstly, we have a new property, named “_Thickness”. This property’s purpose is -you guessed it- to adjust the thickness of the ring. After it’s redeclared in the subshader, we have the fragment shader. It may look a bit confusing, but the only differences from the disk mask shader can be found in lines 62 – 64. These 3 lines are what change the whole behavior of the shader. And lines 62 and 63 are just some temporary floats to make line 64 a bit prettier! So let’s take a closer look on what’s going on here:
In line 62 we store in a variable named “rd” a value that corresponds to half the thickness of the ring. Also, in line 63 we store in a variable named “rc” that has a value that corresponds to the radius of the ring minus the value of the aforementioned “rd” variable. Let’s see these values in a more helpful form: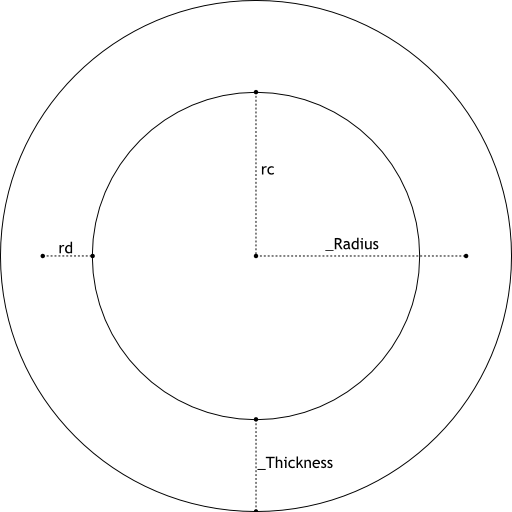
The names by themselves don’t really help visualize it, this is why I made this cool diagram. It’s important to realize that _Radius is the distance from the center of the circle to the middle of the actual ring, not past it. This is also obvious if you realize that with little hardness the ring is soft on both sides, hence it’s darkest point is at the middle of the ring.
So, the only thing left to discuss is line 64. This is the line that does the trick. Before I go through what it does, let’s remember the equivalent line in the disk mask shader:
float circle = saturate(dist/_Radius);
In the disk shader case, we wanted any pixel whose distance from the center was smaller than the radius of the disk to be dark, and the rest to be white. We applied the division to give it a soft edge, but the main concept was this:
Distance from center smaller than radius : Dark

Distance from center bigger than radius : White
So let’s work backwards to get to what line 64 does. In the same pseudo-pseudo-pseudocode way (yes, 3 pseudos), what we want can be expressed like so:
Distance from center bigger than radius - half of the thickness AND distance from center smaller than radius + half of the thickness : Dark

Distance from center smaller than radius - half of the thickness OR distance from center bigger than radius + half of the thickness : White
Keep in mind that this hypothesis works only for the top right quadrant of our ring, so just the positive values of the x and y axes. It’s somewhat easier to visualize (I think). Let’s replace the real English words with some variable names to bring this puppy closer to code:
dist bigger than (_Radius - rd) AND dist smaller than (_Radius + rd) : Dark

dist smaller than (_Radius - rd) OR dist bigger than (_Radius + rd): White
Since “rc” is basically (_Radius – rd), let’s replace that and also make it more code-y:
dist > rc && dist < _Radius + rd : Dark

dist < rc || dist > _Radius + rd : White
MATH!
dist - rc > 0 && dist - rd < _Radius + rd - rd : Dark (subtracted with rd)

dist - rc < 0 || dist - rd > _Radius + rd - rd : White
At this points I don’t know if this is helping but meh:
dist - rc > 0 && dist - rd < rc + rd <=> dist  - rc > 0 && dist - rc < _Thickness : Dark (because 2 * rd = _Thickness)

dist - rc < 0 || dist - rc  > _Thickness : White
Remember our hypothesis? This just works for the top right quadrant and we also have to consider the negative values as well. This is why we use the absolute function:
|dist - rc| < _Thickness : Dark

|dist - rc| > _Thickness : White
Which might make more sense if we write it like so:
-_Thickness < dist - rc < _Thickness : Dark

dist - rc > _Thickness || dist - rc < -_Thickness : White
This is why I use abs(dist – rc) which I then divide by rd to get that nice smoothness. I also use “saturate” on the result to clamp it from 0 to 1, since I wan’t values for my alpha channel. The rest are exactly like the disk mask shader, so I suggest you check that if you see something confusing.
Conclusion
I’m fairly certain that I both over-explained this shader AND made it more confusing. However, this process helped me quite a lot to understand how the shader works. It also helps using some sample numbers. Or, again, that’s what helped me. To be honest, you don’t really need to understand how it works. Just take it and use it to make something cool. And if somebody asks you to explain how you made it, throw a smoke bomb and run. I would also skip town.
See you in the next one!


